Friday, September 30, 2011
Wednesday, April 6, 2011
diy tutorial: felt rosebuds
A few posts ago, I promised to detail how to make felt rosebuds. To make them, grab felt, scissors, glue, and a pen.
Cut a 4 inch felt square to start, later, try experimenting with different size of square for a smaller or larger rose. I also suggest cutting the corners off.

 Now draw a spiral onto your felt square and then cut it out. I guess if you are really crafty, you could skip the tracing part, however, I can’t cut in a straight (or curvy) line to save my life. Trust me, I have scissors with a laser pointer built in to help me cut correctly!

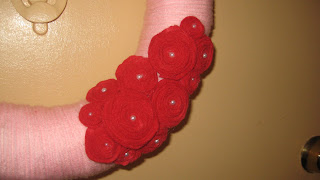
 Now that you’ve got your spiral ... start rolling the felt spiral from the inside out. Once you have rolled all the felt up, glue the end and voila, you’ve got a rose! To jazz it up, add a pearl, stone, or straight-pin.


Cut a 4 inch felt square to start, later, try experimenting with different size of square for a smaller or larger rose. I also suggest cutting the corners off.

 Now draw a spiral onto your felt square and then cut it out. I guess if you are really crafty, you could skip the tracing part, however, I can’t cut in a straight (or curvy) line to save my life. Trust me, I have scissors with a laser pointer built in to help me cut correctly!
 Now that you’ve got your spiral ... start rolling the felt spiral from the inside out. Once you have rolled all the felt up, glue the end and voila, you’ve got a rose! To jazz it up, add a pearl, stone, or straight-pin.


Thursday, March 17, 2011
irish sweet "potatoes"
Growing up, my mom would buy St. Patty's day "Spuds" from Sees Candy. This year, she saw an article detailing how to make a homemade version and knowing how much I like to bake, sent it to me. They were so fun and easy to make!
Step 1: Beat 4 tablespoons each softened unsalted butter and cream cheese with 1 teaspoon vanilla and ¼ teaspoon salt until pale and fluffy. Please note: I doubled the recipe.
 Step 2: Mix in 1 pound powdered sugar and 2 cups chopped walnuts until smooth. Refrigerate until firm, about 1 hour.

 Step 3: Roll dough (1 tablespoon each) between your hands. Shape into “potatoes.” Roll in cinnamon and brush off excess with a pastry brush.

 Step 4: To create “eyes,” stick in walnut pieces (I didn't do this step). Refrigerate for 30 minutes.


Step 1: Beat 4 tablespoons each softened unsalted butter and cream cheese with 1 teaspoon vanilla and ¼ teaspoon salt until pale and fluffy. Please note: I doubled the recipe.
 Step 2: Mix in 1 pound powdered sugar and 2 cups chopped walnuts until smooth. Refrigerate until firm, about 1 hour.
 Step 3: Roll dough (1 tablespoon each) between your hands. Shape into “potatoes.” Roll in cinnamon and brush off excess with a pastry brush.
 Step 4: To create “eyes,” stick in walnut pieces (I didn't do this step). Refrigerate for 30 minutes.

Sunday, March 13, 2011
city of brotherly love
 My boobs and I went back to Philly this weekend. It was chillier than last summer, but we had a good time. Even had a chance to visit Independence Hall. Amazing the history that rests in that town.
Makes you think.

luck o'the irish - yarn wreath
If you've hung out with me in the past few months, you know I am now obsessed with yarn wreaths. I first came across them in the fall, and fell in love with one I saw on etsy. While deciding whether or not I should invest $50 in one, I figured I could probably make one myself. I scoured the internet, looking at several tutorials along the way, and then dove-in head first.
My first attempt was a Valentine-themed wreath and I'm not going to lie, I think it turned out great!
 I decided to make another wreath for St. Patrick's Day - inspired by this guy ...

Finnegan is a small leprechaun I bought in Savannah a few years ago. I don't know why, but I absolutely love him. I also have a witch that I bring out at Halloween. I never know quite what to do with Finnegan, until I joined the yarn wreath world! His felt jacket and hat just screamed out to me - "Make me into a wreath - plllllease!"
To start, you will need to buy either a straw or styrofoam wreath from your local craft supply store. For my Valentine wreath, I used straw and this time I chose green styrofoam. Contrary to popular internet opinoin, I prefer the styrofoam. The straw wreath didn't hold it's shape and was lumpy. If you chose to go the straw route, keep the plastic wrapping on the wreath.
Next, wrap your wreath with yarn. You will want to keep it tight and remember, it won't be perfect and that's okay. Imperfections are what make them who they are. I like to wrap mine twice - the second time evens everything else and adds a layer of texture. This part is time-consuming, but mindless so you can watch tv while you wrap.
 Tie a knot to begin and tie one at the end. I used just less than one full ball of yarn to complete mine.
 Now that you've got your wreath wrapped, it's time to decorate! This time around, I decided to decorate mine with pom-pom flowers!
To make the flowers, cut a strip of felt about 2 inches wide - please note how awesomely straight my felts strips are! The longer your strip is in length, the larger your flower will be. Fold your strip in half and glue the edges together. Make sure ONLY to put your glue right at the edges, not in the center of your fold.


 (Sidenote: If you would like to buy a makeshift "Professor Wormbog"desk to assist in your gluing, click here.) Cut little notches along the length of the felt, only going about halfway through to the other end. You’ll be cutting on the fold.


 When I get home from Philly, I will post a tutorial on the felt roses I used in the Valentine's wreath - they are just as easy to create.
My first attempt was a Valentine-themed wreath and I'm not going to lie, I think it turned out great!
 I decided to make another wreath for St. Patrick's Day - inspired by this guy ...
Finnegan is a small leprechaun I bought in Savannah a few years ago. I don't know why, but I absolutely love him. I also have a witch that I bring out at Halloween. I never know quite what to do with Finnegan, until I joined the yarn wreath world! His felt jacket and hat just screamed out to me - "Make me into a wreath - plllllease!"
To start, you will need to buy either a straw or styrofoam wreath from your local craft supply store. For my Valentine wreath, I used straw and this time I chose green styrofoam. Contrary to popular internet opinoin, I prefer the styrofoam. The straw wreath didn't hold it's shape and was lumpy. If you chose to go the straw route, keep the plastic wrapping on the wreath.
Next, wrap your wreath with yarn. You will want to keep it tight and remember, it won't be perfect and that's okay. Imperfections are what make them who they are. I like to wrap mine twice - the second time evens everything else and adds a layer of texture. This part is time-consuming, but mindless so you can watch tv while you wrap.
 Tie a knot to begin and tie one at the end. I used just less than one full ball of yarn to complete mine.
 Now that you've got your wreath wrapped, it's time to decorate! This time around, I decided to decorate mine with pom-pom flowers!
To make the flowers, cut a strip of felt about 2 inches wide - please note how awesomely straight my felts strips are! The longer your strip is in length, the larger your flower will be. Fold your strip in half and glue the edges together. Make sure ONLY to put your glue right at the edges, not in the center of your fold.


 (Sidenote: If you would like to buy a makeshift "Professor Wormbog"desk to assist in your gluing, click here.) Cut little notches along the length of the felt, only going about halfway through to the other end. You’ll be cutting on the fold.
Start at one end of the strip and start rolling it up, like you would if you were rolling a sleeping bag. Dab a few dots of glue along the way to hold things in place. When you are done rolling your flower, make sure you secure the outside edge with a generous amount of glue so it doesn’t unroll on you.


Now it's time to start gluing your decorations to the wreath. Have fun with it - again, it doesn't have to be perfect. Your friends and family will dig it!

 When I get home from Philly, I will post a tutorial on the felt roses I used in the Valentine's wreath - they are just as easy to create.
Thursday, March 10, 2011
diy garland
If you look closely at my cookie exchange photos, you will notice some cute garland hanging from my bar. Well, not only is the garland cute, it is handmade and cost next to nothing to make!
Step 1 - Purchase decorative paper from your local craft supply store. I bought mine in the scrapbook aisle at Joann's Etc.
Step 2 - Using a paper punch, punch holes in your paper. I happened to have two different circle punches from another craft project so I used what I have. If you do not have a punch, they are about $10 at Michaels, and you can usually find a 40% off coupon in on the web. I liked using two different shapes, but you could punch them out in the same size/shape.


Step 3 - Take two of the same size/style paper circles, and glue them to a piece of twine. Et voila ... you have a cute, inexpensive garland!
 It helps if you have a feline assistant, ensures the project will run smoothly!
cookies, cookies, cookies
I have always wanted to host a cookie exchange, however, during the holiday season I am often too busy and it is difficult to find a weekend that works for everyone. This year, I had the bright idea that I should host a Valentine's Cookie Exchange, and my hostess-in-crime Amanda agreed.
Our party was the Saturday before Valentine's and it was the one Saturday in February that was 85 plus degrees. I was having too much fun to snap a ton of photos, but here are some of the decor and food ...


 I decided to challenge myself in honor of the party and attempted my first batch of macarons! While Bottega Louie won't be calling me anytime soon, I was proud of my Chocolate Macarons with Espresso Buttercream!
Saturday, January 22, 2011
even dogs like christmas!
I am a sucker for Christmas. I love to decorate, listen to Christmas music, discover new crafts ... and buy presents for pretty much every one I know, including dogs.
My mom has two dogs, Riley and Mae, who really believe I am their sister. My mom's boyfriend Lester, henceforth referred to as Mo, also has two dogs ... Poppy and Pea, who would like you to believe that she was abused in her former life. And I would be remiss if I did not mention my niece Abby, see gratuitous cute picture below.

First I mixed together 1 1/2 cups whole wheat flour and 1 1/2 cups white flour.


My mom has two dogs, Riley and Mae, who really believe I am their sister. My mom's boyfriend Lester, henceforth referred to as Mo, also has two dogs ... Poppy and Pea, who would like you to believe that she was abused in her former life. And I would be remiss if I did not mention my niece Abby, see gratuitous cute picture below.

This year, instead of getting them all toys which they would destroy, ignore, or lose in their already huge pile of current toys, I decided to bake them dog treats. The idea came to me while browsing through the aisles of Cookin' Stuff, my favorite local cooking supply store. Cookin' Stuff has bins upon bins of cookie cutters and I found a dog bone I thought I could do something cute with.
After googling "homemade dog biscuits," I was surprised to find hundreds of recipes. After doing some research, I settled on the following recipe:
First I mixed together 1 1/2 cups whole wheat flour and 1 1/2 cups white flour.
I then added my dry mixture to 1/2 cup peanut butter and 1 cup milk - and then beat it all together in my KitchenAid.
I then took the mixture and rolled it into 1/4 inch thick sheets, and then using my bone cookie cutter, cut out the cookies.
After only 15 minutes in a 350 degree oven, they came out perfect! One back made nearly 60 treats, enough for everyone to have ten cookies each. I forgot to take photos of the dogs enjoying their gifts, but trust me, they did!
Thursday, January 20, 2011
butternut squash soup
In October, I attended a party at Wolfgang Puck Bistro in downtown LA. During the party, we were served Butternut Squash Soup shooters ... and for me, it was love at first bite. Coincidentally, I had volunteered to make a soup course for Thanksgiving ... et voila!
I have never attempted to make butternut squash soup so I was a little nervous about the process, especially when it's a Wolfgang recipe! Turns out, while time-consuming, it's very easy to make and so delicious - I've made it several times since Thanksgiving!
Wolfgang Puck Savory Butternut Squash Soup
3 3/4 pounds pumpkin or butternut squash
1 acorn squash (about 1 3/4 pounds)
6 tablespoons (3/4 stick) unsalted butter
1/2 teaspoon kosher salt
1/8 teaspoon freshly ground white pepper
1/4 teaspoon ground nutmeg
1 white onion (about 4 ounces), peeled, trimmed, and finely diced
1/4 teaspoon ground ginger
1/8 teaspoon ground cardamom (I used garam masala instead)
4 cups chicken stock
1 cup heavy cream
1 sprig fresh rosemary

For those of you unfamiliar with what butternut and acorn squash look like ... here is a photo. I actually found my squash at Trader Joe's, but I know Whole Foods carries them as well. Acorn seems to be more difficult to find.
 Unfortunately, these types of squash are difficult to cut, so my trick is to pop them in the microwave for a few minutes - it will make your life so much simpler!

After cutting the squash in half, and spooning out the seeds, brush with melted butter and season with salt, pepper, and nutmeg. Arrange the squash cut side down on a rack placed in a baking tray and bake until tender, for about 1 1/2 hours. Cool, scoop out the insides of the squash and reserve.


In a medium stockpot, melt the remaining 4 tablespoons of butter. Over low heat, sweat the onion. Do not allow it to brown. Add the pureed squash and cook over very low heat until heated through, stirring occasionally. Do not allow it to bubble up. Season with the salt, pepper, ginger, and cardamom.


Pour in the stock and bring to a boil, still over low heat, stirring often. Cook about 20 minutes.
In a small saucepan, heat the cream with the rosemary sprig. Remove the rosemary and pour the cream into the soup. Transfer to a food processor and process, in batches, for 2 or 3 minutes.
After reading an article in Food Network Magazine, I decided to serve my soup with a topping bar – croutons, parmesan cheese, pepitas, scallions, and crème fraiche.

This soup is truly delicious and one I will keep eating until all the winter squash is gone!
Subscribe to:
Posts (Atom)